Make your own bunting for a special occasion using beautiful patterned card
It's nearly my birthday and I thought I'd make myself some bunting - good excuse to make something for me using my favourite scrapbooking papers ;)
I picked out all of my favourite patterned papers and made this bunting to reflect things I like, so it's a complete mixture of colours and patterns. I will give you a pattern you can download and use. I'll talk you through how to make a basic bunting flag but then you can adjust it to your or your recipients preferences. You could use papers from one paper pack so they match or just go wild like I have and pick out your favourite.
You could make the bunting without using the lettering so it could be used all year round as decoration. Or maybe put your child's name across it to decorate their bedroom. But most of all just have fun decorating each flag. If you get bored of a flag or get some new paper that you prefer, just take off that flag and add the new one.
Follow the below link to find out how the bunting was made
You will need
- Bunting flag and 'Happy Birthday' lettering template (download here)
- Selection of patterned card
- Glue and double sided foam pads
- Decoration (I mainly used die cutting, but you can stamp, decoupage - whatever you prefer)
- Length of ribbon or string to thread your bunting to
- Guillotine with scoring blade
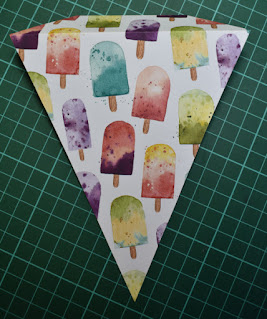
- Download the templates and cut out 13 bunting flags from your patterned card - cut around the outside - do not cut the line that goes across the bunting - this is a fold line
- Score across each bunting flag along the fold line. I found it easiest to do this on a guillotine by lining up the two side points with the cutting line on your guillotine and then running the score blade across - see below photo. (Once folded the smaller part will fold to the back and will eventually be glued down to hold the ribbon)
- Roughly cut around each letter template (don't cut too closely to each letter outline). I have made the lettering template so the letters are all backwards. This is so you can glue each letter to the back of your chosen coloured card and then cut it out.
Rough cut around the letter Glue it to the back of your patterned card Cut the letter out Turn over - hey presto - your patterned letter for your flag
- Decorate each flag as you wish. I cut a fancy border (It came with my Sizzix machine) for each of my flags and stuck the letter on with foam pads (doubled up for extra height). The decoration I used for each are as follows (below each photo is a note of the products I used):
- H - I stamped two lollies, cut out and stuck with some string in between them so it could hang from the bottom of the flag.
Products used: Ice Lolly paper from Ice Cream Corner DSP by Stampin Up
Twisted Citron and mustard seed distress ink pads
White and beige card
White string
Sweet Ice Cream stamp and die set by Stampin Up - A - I cut two leaves from green card and stuck behind the letter A before attaching to flag.
Products used: Red outline flower card from 'All My Love' DSP by Stampin Up
Red and green card
Leaf die - P - I die cut a white and a red beach hut, then cut the red one down to stick the stripes to the white one. I die cut yellow sand and sandcastle and 2 white seagulls. I coloured the seagull's beaks yellow and the wing in light grey.
Products used: Blue striped paper from 'Peaceful poppies' DSP by Stampin Up
Blue, white, red and yellow card
Beach hut and seagull dies (got cheaply from The Range)
Promarkers - warm grey1 and mustard - P - I die cut a branch circle using a die from Swirly scribbles die set from brown card and stuck centrally on the flag. I stamped and die cut 3 feathers on white card using blue ink and attached them hanging off the bottom of the flag.
Products used: Feather paper from 'Bird Ballad' DSP by Stampin Up
Blue, brown and white card
Four feathers stamp and die set by Stampin Up
Swirly Scribbles dies by Stampin Up - Y - I die cut and made up the small poppy form the poppy moments die set. I also cut a leaf and attached both to the top of the flag. I stuck 3 red gems on the letter Y
Products used: Rich red poppy paper from 'Peaceful Poppies' DSP by Stampin Up
Black, green, red and dark red card
3 red gems
Poppy Moments dies by Stampin Up - B - I punched out 3 balloons from paper in the same DSP ad stuck some wire to the back of each which I then glued to the back of the bunting flag so they stand above the flag. I glued a candle embellishment to the letter B.
Products used: Blue and green patch paper from 'Ice Cream Corner' DSP by Stampin Up
Blue card
Small candle embellishment
Wire
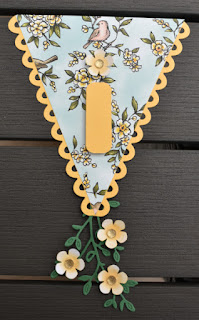
Birthday Balloon punch by Stampin Up - I - (Gosh I found this one difficult mainly because the 'I' didn't look like a letter - I was really pleased with this design in the end though). I punched 4 flowers from white card and coloured the centre of each flower using the dauber and the yellow ink pad. I then shaped the flowers using a sponge pad and large embossing tool. I cut the branch from green card and glued so it hangs out of the bottom of the flag. I glued 3 flowers to the greenery but the flower on the flag was attached using double sided foam pads
Products used: Blue background bird paper from 'Bird Ballad' DSP by Stampin Up
Yellow and white card
Leaves die from 'Petals and more' die set by Stampin Up
Small flower punch by Stampin Up
So Saffron ink pad by Stampin Up
Finger dauber
Sponge and large embossing tool
Gold faceted gems - R - I just glued a little bee embellishment to the letter
Products used: Gold bee paper from 'Golden Honey' DSP by Stampin Up
Gold card
Bee charm - T - (T - my favourite hot beverage!! :) ) I cut the teacup, steam and tag from the Lawn Fawn die set. I threaded some ribbon to the tag and stuck behind the teacup. Then glued all items to the flag. I used the embossing folder on the letter T before attaching to the flag
Products used: White spot on red paper and floral paper from 'All my Love' DSP by Stampin Up
Brown and white card
'Outside in Stitched Mug' die set by Lawn Fawn
Brown ribbon
'Seaside' textured impressions embossing folder by Stampin Up - H - I punched out 2 cones and 4 ice cream dollops from paper within the DSP. I glued one ice cream together then glued the other to it's back with some string caught in between so it can be hung off the bottom of the flag. I glued some sprinkles to the ice cream and 3 on the letter H.
Products used: Ice Cream Paper from 'Ice Cream Corner' DSP by Stampin Up
Ice Cream builder punch by Stampin Up
Brown thread
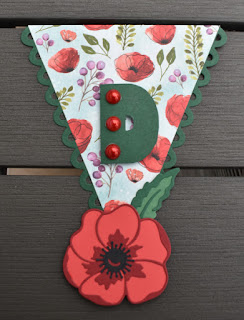
Ice Cream Corner sprinkles by Stampin Up - D - I die cut and glued together the large Poppy from the die set and glued to the bottom of the flag. I added 3 red domed gems to the left side of the letter D
Products used: Blue background poppy paper from 'Peaceful poppies' DSP by Stampin Up
Poppy Moments die by Stampin Up
Green, black, red and deep red card
3 red domed gems - A - I glued a bee embellishment to the bottom of the letter A
Products used: Black and gold bee paper from 'Golden Honey' DSP by Stampin Up
Black card
Bee charm - Y - I punched out 5 small flowers from white card. I used finger daubers and ink to colour the centre of the flowers - 2 yellow, 2 paprika and one blue. I shaped them with an embossing tool and stuck onto the flag. I added gold faceted gems to the centre of the flowers.
Products used: Flower paper from 'Bird Ballad' DSP by Stampin Up
Blue and white card
Island indigo and so saffron ink pads by Stampin Up
Paprika ink pad by Versa
Gold faceted gems
Sponge pad and large embossing tool
Small flower punch by Stampin Up
Finger daubers
- H - I stamped two lollies, cut out and stuck with some string in between them so it could hang from the bottom of the flag.
- To finish off your bunting flags put a little bit of glue or double sided tape at the very top on the back as per the below photo. Put your ribbon next to the fold line and fold the flap over to stick down to the bag of the flag. (Ensure the string or ribbon runs freely)
- Join all of your bunting flags in the same manor to the length of ribbon. I put a magnolia flower between the Y of Happy and the B of birthday (see my blog page here on how to make a magnolia flower)
- Hang it up and admire your work


